An in-depth and comprehensive guide to improve the speed and performance of WordPress with actionable steps. We are going to see everything from the why to the how to improve speed. We are going to see both services you can use (e.g., DNS, CDN, etc.) and actions to take on WordPress (e.g. changing settings, removing plugins, etc.).
When it comes to suggestions I will try to avoid both extremes: I am not going to present 20 options and leave you to choose among a giant list of pro and cons, but I am also not just going to say pick X. I am going to explain my reasoning and provide a few good options. This way you can choose the compromise you prefer.
This guide is for people that already know how to manage a WordPress website, but do not have a deep technical knowledge, such as knowing the intricacies of the DNS protocol. It is geared toward people for which their website matters: people that may have a few websites or one that use for work. You are not going to spend thousands of dollars to improve the speed of your website, but you care enough to improve it as much as you can.
Why Speed is Important?
Speed is vital for e-commerce and large websites: for them, even a slight decrease in performance means a direct hit in revenues. If your website is slow, users are going to leave without buying. Even a small business that makes a 1000$ per day would lose 3650$ in a year, if it loses just 1% of its customers. This means that for such users spending a 1000$ to improve speed, even slightly, is more than worth it.
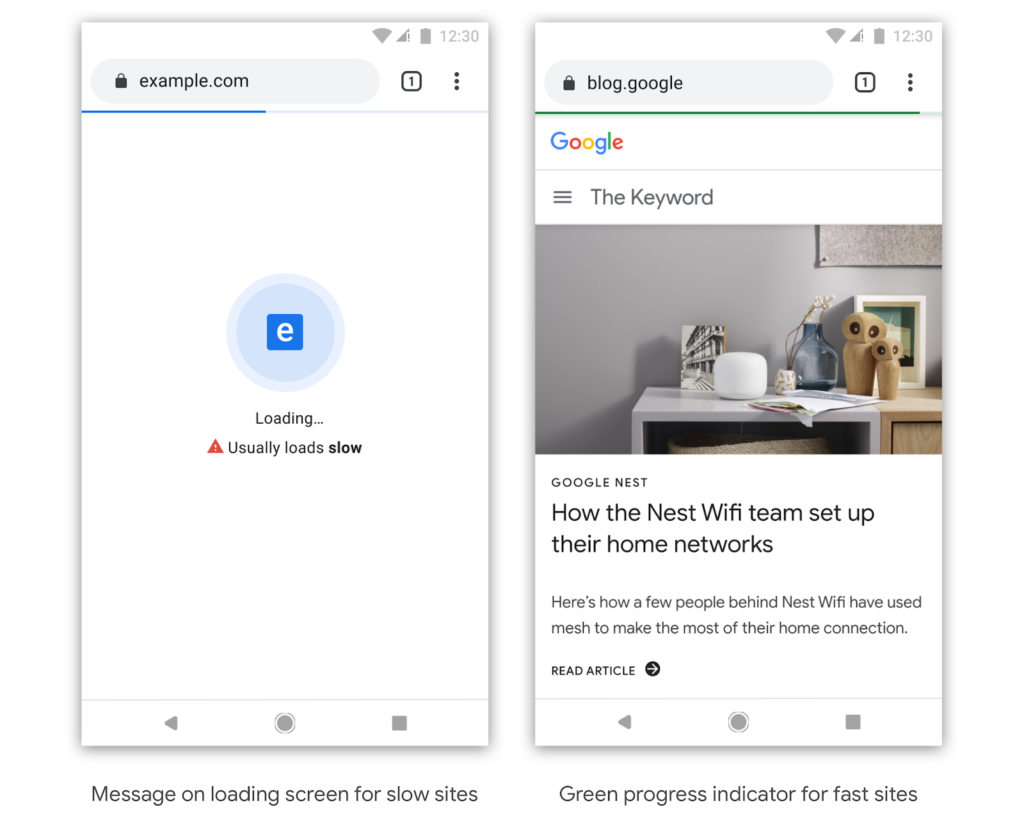
But maybe you are not there yet. So why should you care about speed? Well, at any level, low speed can affect the chances of your website to be found. Google is penalizing slow websites in their search results for 10 years. This means that you might never get the chance to be found, if your website is not quick enough. Now they are even going to shame slow websites in Chrome, by showing a warning while your site is loading. That is just mean.
The point is that the quicker your site is, the better will be for everybody: your users will have a better experience and you will get more users and more money. Your users will feel frustrated if you have a slow website. And they might leave it.
Finally, you have to think about helping your average user. You might have a great connection at your house, but your average user might not have one. So, if you pair their slow connection with your slow website you meet disaster. You cannot control your users, but you can control your website. Caring about your website speed is like having good hygiene, you should do the best you can.
What is Slowing Down your Website?
WordPress is incredibly popular: it powers more than 33% of the top 10 million websites. However, it gained widespread usage because of its ease of use and flexibility, not because of its performance. It started as a blog software, but now you can use it for everything, which is part of the problem as we are going to see. Sometimes you are at fault for slowing down your website.
You Are the Baddie
In fact, the first issue is that you might use WordPress to do everything under the sun, for your business.
You should not manage your business (e.g. using a CRM plugin) or send a newsletter directly through WordPress. You should offload anything that you can to an external service or program: loading static files, security checks, checking if all links are correct, etc. The sheer volume of cool plugins available for WordPress is amazing, but you should resist the temptation.
You should consider that it might be better to have one high-quality (and paid) plugin to do a lot of things, than a bunch of free ones. Of course this is not always true, but you have to think about any plugin you use and be sure that you need it.
You should not be a fanatic about it, there is more than just speed. For instance, I do not use Akismet to check for spam comments for privacy reasons. I do not want to send data about legitimate users to third-parties, unless it is necessary. You might have other needs and interests.
A more common concern is security. It makes sense to sacrifice some speed in exchange for better security. Even if you do not care that 60% of small businesses fold in 6 months after a cybersecurity breach. Improving security saves you money, for the simple reason that if you block spammers and bots your website consumes less resources. This can lead to significant savings when using a service with limited included resources, like a CDN or a managed hosting.
The Infrastructure You Use
The second big class of items that can slow your websites are the services you use to bring the content to your users. This means every component of your infrastructure: DNS, hosting, CDN, etc. There are a few things to consider for each piece of the puzzle. It is not always obvious how exactly they impact the performance of your website, but we will see how to understand that.
Obviously you know about the importance of good quality hosting, but you might not have thought about the DNS servers that answer requests for your domain. Or the side-effects of using a CDN, or services that look like a CDN (e.g., Cloudflare), but are not one.
We are going to look about each of them in detail.
Your WordPress Setup
Finally, you have to consider the whole WordPress setup and everything surrounding your content. In fact there is a difference between the stuff you write and the content your WordPress actually serve to the user.
I am not talking literally about the articles you write. Yes, it is true that if you use a lot of images this might slow down a website, but you are probably using them for a reason. No, I am talking about the real content that WordPress will serve to people: HTML, JS files, images, etc. What your user will receive will depend, for example, on the theme you use. A complicated and badly coded theme might send a lot of content to the user.
There are also ways to present the content better, so to speak. There are plugins you can use to reduce their size, manipulating them before sending them to the users. However, you can also use programs to optimize images before uploading them to your website, so that they are already optimized.
You should also pay attention to configure WordPress correctly to get the best performance.
Is Your Website Slow?
Now, before looking at ways to improve the speed of your website, you might consider checking whether your website is actually slow. This might be more complex than you think, because what is speed really?

The problem is not philosophical, but practical: there are actually differences between technical measures and the perception of how quick your website feel to the users. And the two aspects interact in complex ways. For instance, an important technical measurement is called the Time to first byte (TTFB): the time it takes for your webserver to send the first byte to the client. Basically, how long it takes to the website to answer I’m here after the user asks Are you there?
In theory the lower the number the better, but what if the webserver gives a partial answer only to appear quicker? Is it good or bad? On one hand, it is a bit deceptive because the user will need to wait more time before actually doing anything with the content. On the other hand, a lower number will avoid the risk that the browser will retry a request for the page and consume more resources.
And this is just on technical data point. The TTFB is a completely different concept from the total load time: the time it takes for the user to receive the whole content on a page. A lot could be said on each of them and they could matter in different ways for each website.
Your Website Must Feel Quick
So, what should you care about? The important part is the perceived performance: how fast the website will feel to the user. The actual true speed is less important: a user will not gossip like an edgy teenager about your technical measurement.
Look how large their TTFB is…
Ugh! Why that website is even talking to me
So what is perceived performance and how you can improve it? There are a few well known numbers that come from a 1993 book of Jakob Nielsen, usability expert:
- 100 milliseconds. Any operation that is completed in 100ms or less feel instantaneous.
- 1 second. Anything that takes 1 second or more starts to feel slow.
The basic trick of making your site feel quick is to never leave more than a few hundred milliseconds where nothing happens. This means actually doing something like loading content as soon as you can, and not necessarily all in one block. It also means appearing to do something like displaying a progress bar.
In technical terms there are many such tricks, like using animations to hide loading times or loading the visible content first so the user sees something as soon as possible. The big issue is that it is difficult to measure objectively how the user perceives the speed of your website. You need a bit of common sense, experience and a good designer to solve any problem found.
Real Speed Still Matters
It is much easier to measure technical performance: that can be captured with a few numbers and tests. So, this is where most people concentrate, you can visibly improve there and show that you have done something. Now, to be clear: technical measurements of speed are not useless, the problem is that they must be understood in context.
For instance, to lower the initial perceived speed you need to have a low TTFB, so that you can show something to the user. The problem is once you have achieved a low TTFB you still have to understand what to show to the user.
Aside from the issue of what exactly to do with the test results, they can be actually hard to decipher to begin with. Even if you are a developer, you might be puzzled on what to act upon, how much effort it takes to improve and so on.
Measuring Speed
That is why I suggest starting with Pingdom Website Speed Test. It gives you reasonably simple overview of what is happening with your website.
The most useful part of this tool are the speed results from different places. You can measure the performance of your website from users in London, Sydney, San Francisco, etc. And you get a simple score and load time. It is easy to understand if you have any real issue on your hand.
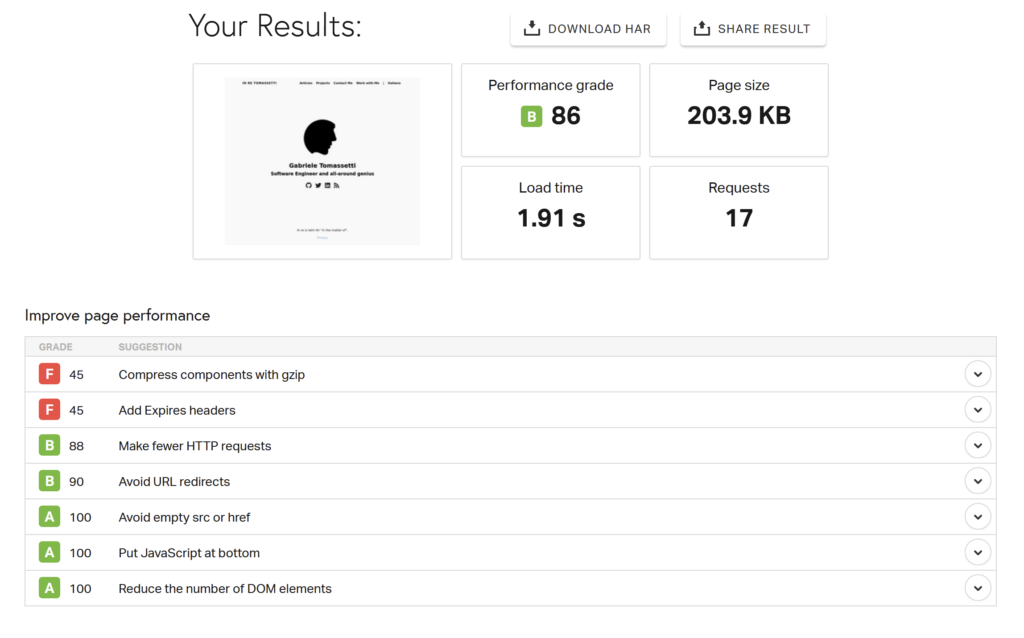
As you can see, the score (performance grade) and the load time are actually telling two different things:
- The performance grade is essentially a technical evaluation of your website, how much you are following good practices
- The load time tells you the total load time, how much time it takes to see the whole page
You can get one good result and one bad result. You will also obviously get different load times depending on the region you test. As we said, you cannot really say if a load time is good or bad just from this number. However, since I know you need an answer, generally speaking you should strive for under 3 seconds for the majority of your audience.
Now, if you are serious about speed, remember that you cannot cheat. It is relatively easy to get under 2 seconds on a sparse homepage, it is harder to get that result for a giant long-form article with 10K+ words and lots of images. Of course, the users might be forgiving in exchange to access useful content, but maybe not.
If you get a good performance grade and a bad load time, your problem is probably due to your infrastructure and the fact that you put too much stuff on your website. If you get a bad performance grade, you should start looking at the whole WordPress setup.
Now, if you need to work on your performance grade you must be ready to get deep into technical details. You should take time to understand each element and ditch this tool.
Working on Your Technical Performance
Instead you should go to the Page Speed Insights of Google. You can also access this tool, and more, if you use the Developer Tools in Chrome and specifically the Audit section. This is the best way to use it, if you plan to seriously work on your website as a developer.
First, you should use this tool because is the foundation of all others. It is a Google world; we just live in it. So, other tools, like the Pingdom one or the also well known GT Metrix, are based on what Google says. This also means that other tools might have obsolete suggestions. The point is not that Google is always right, but they are going to follow their own rules and possibly penalize your search result if you do not follow them.
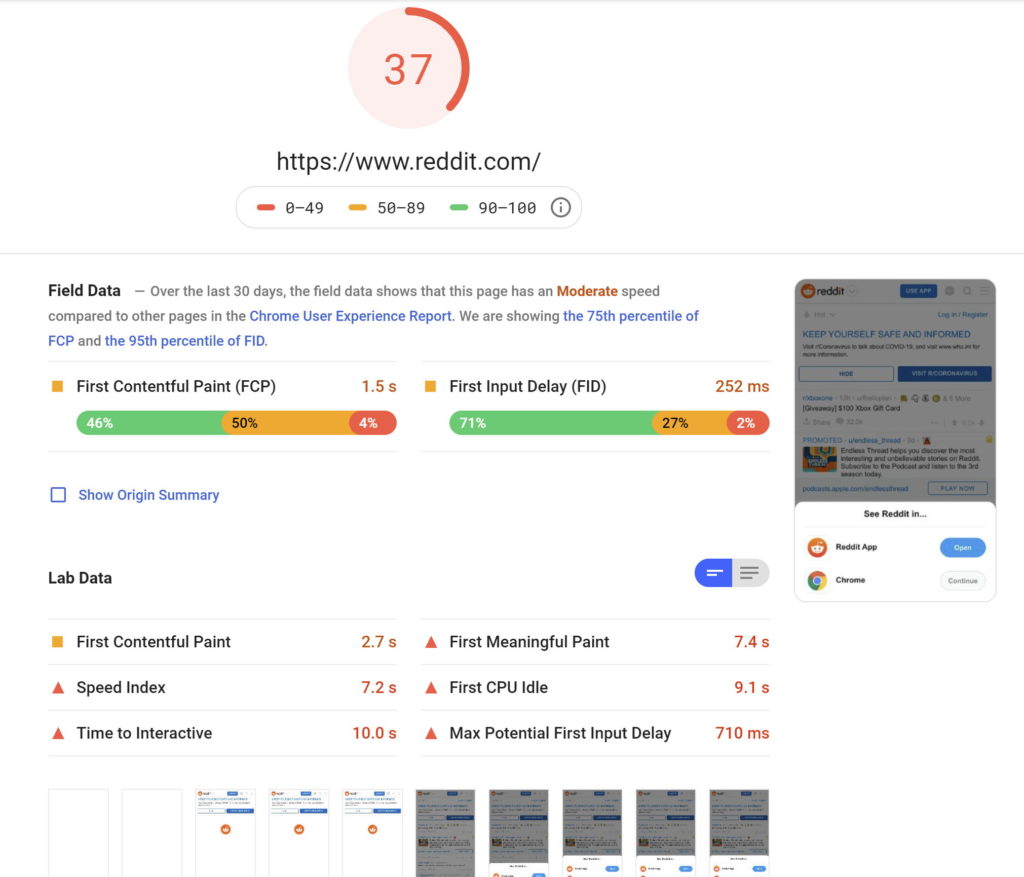
The other reason to use this tool is that it can give you real data based on users of Chrome. So, you can know the technical performance of your real users. Now keep always in mind that having a score of 100 even on Google’s tool should not be your objective. For one, it might cost a lot of effort or a bad user experience. This image shows that Reddit does not have good results, yet they are doing fine. Even YouTube, that is owned by Google, does not have great results. It is meant to be used as a guideline. Furthermore, the tool itself also is slower to follow the official Google suggestions.
For example, I remember that the tool still showed as an issue having too many HTTP requests, when the official line was changed with the new protocol HTTP/2. This is not a big problem anymore, since the new protocol makes many small requests preferable to a few large ones, because they can be made in parallel.
The last good thing about this tool is that it gives you some pointers both for your mobile and desktop traffic. You have to remember to test and optimize both for desktop and mobile devices. Nowadays mobile traffic is around 50% of the traffic on the internet. Obviously, it may be less important for your specific website (e.g., a site dedicated to long-form expert articles), but that is the general rule. And mobile and desktop browsers have different behaviors and constraints, so you have to pay attention to both.
Not All Websites Are the Same
Finally, we are going to end this introduction with an important distinction: your average content-based website is different from a more dynamic website, like an e-commerce or forum.
It is easier to speed up a typical WordPress website like this one, that is mainly used to show articles to the user. The content is mostly static, so it can be fully cached. And users interact with it sparingly and for little bursts of time: they find an article and they read it. Then they read another article, or they leave.
This is different from websites that provide a service. In the case of WordPress installations, it means e-commerce websites, sites that host video courses, forums, etc. In the general case this also includes websites like Google or Facebook, that provide dynamic content to the user.
These websites are harder to speed up because caching is less effective. Users might stay for long periods of time, even hours at a time. They can interact frequently, placing orders, answering to comments, etc. Therefore, the average dynamic website will be slower. Apart from losing users and sales, excessive slowness might lead to lower quality interactions (i.e., a user posts something multiple times, because clicking the button Comment does not seem to do anything).
Hosting
You must start to improve speed by choosing the right hosting. It is the one thing upon which everything else depends. You need a good host for your website, then you can change everything else. It is obviously possible to change hosting but is an hassle and it takes some work to do it without downtime. So, choose right the first time.
Types of Hosting
I would say that there are fundamentally three types of hosting, that are different for reliability, performance, ease-of-use and support:
- shared hosting, where your WordPress website is hosted on the same server together with many other websites (both WordPress and other apps)
- preconfigured hosting, this category includes a service with dedicated resources and already configured to host WordPress
- managed hosting, a hosting well-configured, managed and optimized to serve WordPress sites
Choosing the appropriate hosting for your need and budget is vital, not just for performance. Did you know that 41% of all hacked WordPress installations were violated due to their hosting?
Shared Hosting
Shared hosting is usually where you start because is the cheapest type of hosting. You can usually host not just WordPress websites, but also any other PHP software or even Node.js apps. You can recognize them by the promise of unlimited bandwidth. So, it is cheap and flexible, which is great. However, it does not have good performance. Even worse, any performance you have is not really stable.
The problem is that your website shares the same server with many other ones, so if the other ones get a spike of visits or get hacked, your website will feel it. In practice, this means that you cannot realistically measure your performance, therefore you cannot improve it. The company will manage their platform only in the sense that they will kick out bad websites, one that consumes too much resources. This seems fair, but what happens is that if you get hacked you will get no support and you will just be left in the cold.
Lastly, they tend to have some arguably shady business practices: you get a great first price, then a less-good renewal price. To be fair, they do not hide it1. However, they do that because they could not make any money otherwise. If you want to get the best price, you might also be hooked to long contracts.
That is a compromise that many accept: low price for few rights, guarantees or predictability, but this is no way to reliably get a good performance. So, skip this option if you want good performance.
If you need to pick this option for budget reasons, you should go with SiteGround:
- They are recommended by the WordPress community itself
- They integrate resources like Cloudflare
- They support WP CLI and SSH
- They are actually not that cheap after the first invoice, so you know they have some quality control
- They perform well in performance tests, they have good reviews and also offer more premium services, which means that they are competent
A valid alternative is DreamHost, which is also suggested by the WordPress community, but it has less good performance and reviews.
Preconfigured Hosting
I would preface by saying that preconfigured hosting is not a standard name, but the one I choose to indicate this option. The names your provider will use are probably managed VPS or managed cloud. However, they can be confusing (with managed hosting) or meaningless, if you do not know what a VPS is. So I pick one that defines clearly what the provides gives you: a space ready to use, but that you can customize yourself.
So, what is a VPS? It is a Virtual Private Server: a guaranteed slice of real server resources. You can recognize these services when they talk about dedicated resources. It is flexible, but it also guarantees some resources. Where is the catch? The provider usually manages the VPS, but not WordPress. Basically it updates the operating system and makes sure that the server is well-configured to be safe. However, setting up WordPress for the best performance is left to you.
There is a lot of value in this service: there is a difference between having, in theory, the technical competence to configure a VPS and to actually manage one. Any web service needs a lot of attention, time and requires you to keep updated on the latest attacks. A preconfigured hosting takes care of all of this for you. The downside is that it still leaves a bit of work on you.
Another downside is that you get a safe hosting, but it is not necessarily optimized for WordPress. You get the flexibility of installing any PHP software, like Magento or Joomla, that is already well configured, however nothing is perfect just for that software. For instance, you will probably get some form of caching, but not a CDN included and configured to use.
You can also have as many applications as you want, so you can tweak the level of performance that you find acceptable. You have usually the option to change many settings, either through a standard web hosting control panel, like cPanel, or through a custom interface. The custom interface is usually a better choice, since it can be tailored for WordPress and the services of the provider.
This flexibility makes it ideal for the people that have technical expertise but lacks the time and inclination to actively manage a server. These people can alter some settings to their liking, but also be sure that the server is safe even if they do not keep attention.
Since many managed hosting are geared toward content sites, you might prefer to opt for a powerful preconfigured hosting that you can configure yourself. This might be the best way to get the performance you need or to respect a reasonable budget. In this sense, this option is not a middle ground, but the best for people that need power, but also a safety net.
As we said, the main selling point of this option is flexibility and power. So it is really impossible to say which one is the best in the general case. However, I believe that Cloudways is the best starting option for your search:
- a 3-day free trial without any credit card
- a custom control panel
- they start cheap; although they do not include email, CDN and think backups are so important that you have to pay extra for it
- they integrate support for email, CDN and backups, with the choice of third parties
- advanced caching (Varnish, Memcached) already configured
- they have good performance and good reviews
- you can choose your own cloud provider and server location
Most of the largest providers have a worldwide customer base. This means that their servers are close to the major traffic nodes. If your users comes all from one country that is not a major one, you might be left with a server relatively far from your users.
For instance, none of the major providers have servers in Italy, the closest locations are usually London, Frankfurt, Paris or Amsterdam, depending on the provider. So, the best alternative might be a great local provider that can offer servers closer to your customers. You will probably get a worse control panel and few included optimizations, but you might get better performance.
Managed Hosting
Managed hosting is the safest choice to get the best performance for your WordPress. Providers in this category start with the higher price among all three, but they are experts in managing WordPress. They have a dedicated team that manage their whole infrastructure for you. You can recognize them by their limitations: they limits visits, number of websites, sometimes storage and bandwidth and even the plugins you can use.
This is generally a good thing: they limit badly coded plugins or ones that provide features that should be kept outside WordPress, like analytics collection. They forbid caching plugins that duplicate their own functionality or plugins with security issues. Sometimes, you might also say that they forbid legitimate plugins that would make harder for them to manage their platform. If you go with a managed hosting offer, remember to check their disallowed/banned plugins list.
The reason for these limitations is that they manage everything directly to guarantee the perfect infrastructure on which to run WordPress. You do not even see your server; you use their custom control panel. You get a CDN, an integrated advanced caching and in some cases even premium DNS or a search service (to replace the included WordPress search). All these features are included, but with limits: if you get over the included resource you have to pay. This is partly an excuse to upsell their service, but it is also a fair policy to make sure they can afford the quality of their service.
You also have to consider that getting these services separately can be a hassle, as we are going to see later, getting a CDN or premium DNS from a third-party can be costly and/or complicated.
In short, with managed hosting you get very little flexibility, in exchange for expert management of the infrastructure on which to run WordPress. They are perfect for content-based websites that your business needs. Or for anybody that do not want any hassle in managing their website. They might be less cost-effective for large service websites. If you have millions of users you might be able to hire someone to manage your own infrastructure with better performance at a lower price.
The best choice for managed hosting is Kinsta:
- they have good performance and good reviews
- in addition to included CDN and caching they get you premium DNS service
- they have a great control panel that is easy to use and powerful
- they also gave you SSH access if you want to make some complex management of your website
- they have a great reputation
In this category there are many good alternatives, that offer good performance. You might prefer some offer with a different balance, like Pantheon, that offers a search service on some plans, or a price point, like WPX Hosting, which is cheaper and has less limitations.
There is also managed enterprise hosting, like WordPress VIP, which is a whole class of its own in terms of price and support. They host some of the largest WordPress websites with millions of visitors at the price of thousands or hundreds of thousands of dollars each month. However, few people need that kind of service.
Summaries
Features of shared hosting
- Low price (5-10$/month for good shared hosting)
- You can install many kinds of apps (not just WordPress)
- No guaranteed performance
- Few integrated optimizations like caching
Features of preconfigured hosting
- Medium price (starts with 10-20$/month for good preconfigured hosting)
- You can install many kinds of apps (not just WordPress)
- Your server is configured, safe and manage. You can configure many settings
- You have some form of caching, sometimes it gets also integrated into WordPress
- Guaranteed resources, which brings some performance if you manage your website well
Features of managed hosting
- Higher cost (starts with 20-40$/month) for good managed hosting
- You get the best starting performance money can buy, with services like CDN and advanced caching integrated
- You do not even need to care about anything but your WordPress
- Some limitations included
CDN
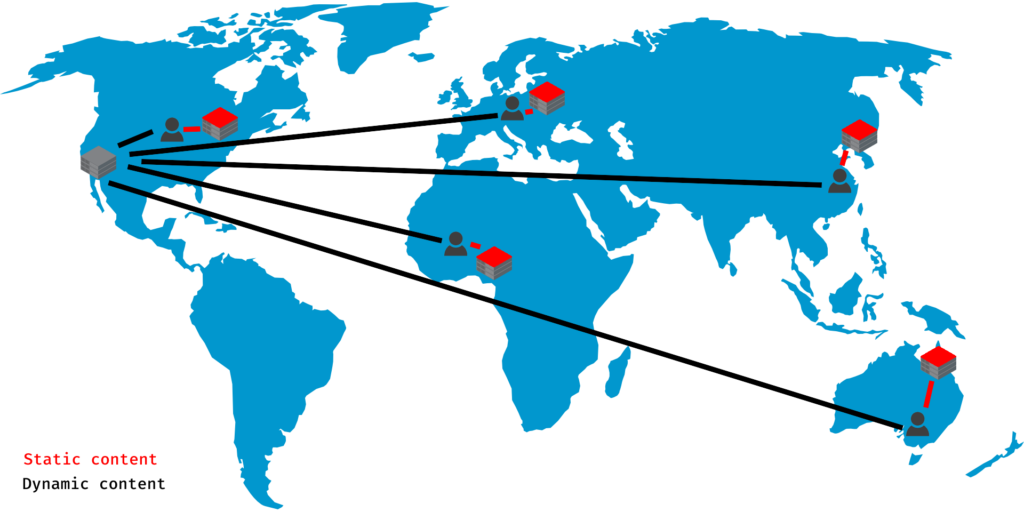
If you have a worldwide audience a Content Delivery Network (CDN) is vital to get the best performance in WordPress, or any website that deliver content. They deliver your static content (i.e., images, JavaScript and CSS files, etc.) to the user. They have servers placed all over the world and each time they deliver from the closest to the user. It is like having multiple copies of your static content: one on the east coast of the USA, one on the west coast of the USA, one in London, one in Japan, etc. This closeness reduces network latency, the time it takes to travel the network, for most of your users.
Obviously, it would be best to have copies of your whole site, but that would not be practical. Static content is different from WordPress posts and pages because it is created once and remains the same for each user. On the other hand, your server generate on-the-fly every time a post when a user requests to see it. At least this is true in theory, in practice things can be a bit different (see caching later).
A CDN can deliver your static content, like the images you put in your posts, because it is simpler to deliver them and so they can optimize to deliver content for everybody. They do not need any special configuration for your particular website. This allows them to add things like their own form of specialized caching. They might cache your content, after the first user in each location asks for it. This reduces TTFB for static files, the time any user have to wait to start receiving content.
WordPress is technically a PHP application, so configuration and management of a server to deliver that is very different from a one for a .NET or a Node.js application. Instead everybody need static content and they form the majority of the size of the content delivered to the user. In short, it makes sense to have dedicated resource for it.
The downside of a CDN is that they were designed for enterprise use, so they had issues that limit their adoption to the masses. Many of them have unreasonable costs. Actually, they do not really cost that much for the content delivered, but they have high minimums for month. Basically, you might have a small website that just create 20GB a month of traffic, but you need to pay a minimum of 50$ a month, which would be equivalent to 100 times that content.
Some of them are completely pay-as-you-go, with no minimum, but they are complicated to set up by novices.
All of this means that, until recently, your only realistic choice would have been to get a CDN through your hosting. For instance, the CDN you get with a managed hosting. This is still a good way to use one. However, now there are a few options that can get you a better deal. The best choice at the moment is BunnyCDN:
- it has a very low monthly minimum (1$)
- it has good performance according to real data from users
- it comes with a WordPress plugin with easy integration.
They seem to save a bit on support, though. So maybe you can also check KeyCDN, which has a low minimum (4$).
Any of them can even be a good choice if you already have a CDN included in your managed hosting. For example, if you consume a lot of bandwidth because you sell digital files. You can configure the chosen CDN to deliver only your downloads and serve the normal static content with the managed hosting CDN. Maybe you can prefer another CDN because it costs less for your level of traffic. Of course, this depends on your use case, but if you do not know where to start I would start from these services.
Wait, What About Cloudflare?

You have probably heard of Cloudflare, one of the most widely used services on the internet. They are good service; however they are not a CDN. They provide a different service: a Web application firewall (WAF) that acts as reverse proxy. A similar service is Sucuri.
WAF means that they are designed to protect your website from bots and common attacks (i.e., generic hacking attempts). A proxy makes a request to a server on behalf of the client. A reverse proxy is something that accepts a request on behalf of the real server. Essentially a proxy is something that the client uses, while a reverse proxy is something that the server uses.
In short: WAF is what it does (defending your server), reverse proxy is what it is (taking requests on behalf of your server).
To accomplish the goal of securing your webserver they take over the access to your website: every user passes through their servers, before it even knows you are there. This way they can stop bad actors. In theory, they could also stop them from even knowing where your server is.
There are some risks and drawbacks in terms of privacy: they see all of your traffic and they may not encrypt all the way in transit, if you do not configure them correctly. However, they also reduce your performance, by increasing the TTFB. This happens because the user must first pass to them before reaching your website. Luckily the increase is small, because to provide their services they also implement a CDN and a DNS service.
However, unless you are on the more costly plans, they do slow your website compared to a normal CDN. There are some ways to counteract this on their paid plans, which include optimizations to image and mobile delivery of content. You could also cache your whole website on their server, which will give you the best performance. Though it is complicated to setup correctly, especially for services sites: you could end up caching the version you (the administrator) see, with the admin bar and all. Remember that even big sites like Steam, made mistakes with caching that end up exposing private information; it is not trivial to configure.
They also have advantages: Cloudflare offers a free plan and thus they can save you money, by reducing bandwidth and visitors reaching your website. There are some websites that uses it just because of the savings. In short, you should pick them if you need more security and want to save some money, otherwise in terms of speed alone a simple CDN is better.
DNS
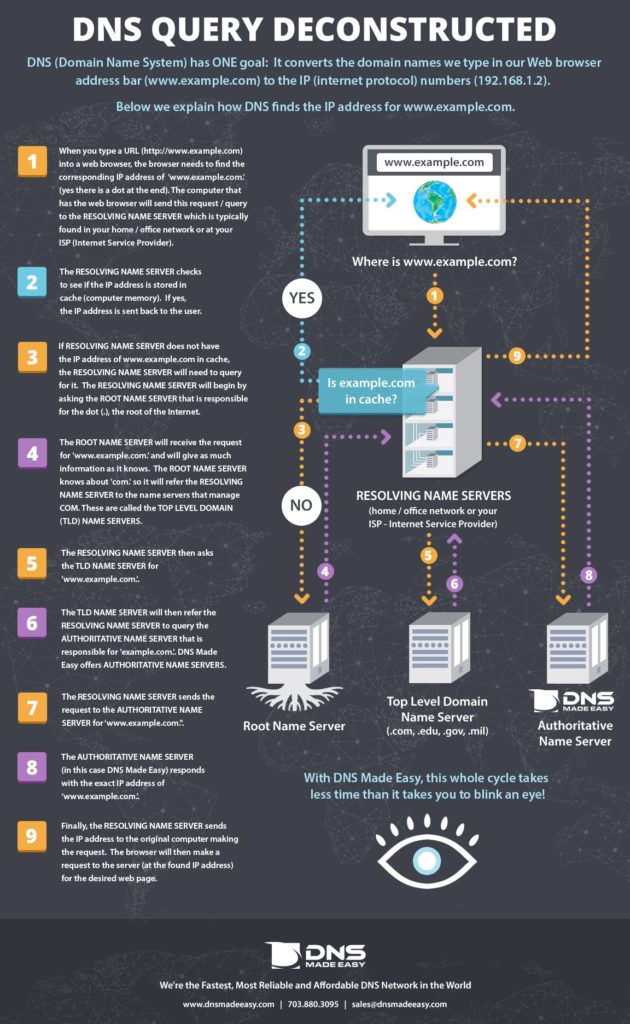
An important, but lesser known, part of your infrastructure is the Domain Name System (DNS). The DNS translates addresses that human can read, like examples.com, into addresses that computers can manage better, like a 1.1.1.1. That is it, but it is an important and complicated job.
DNS is the first step into reaching your server, if this step is taken slowly, the first contact with your website will be slower. The part that we care about is the authoritative nameservers, that is what you can choose. By default, you already have some, provided by your registrar. The issue is that they are usually mediocre at best. So, if you choose a premium DNS provider that provide quicker nameservers, your website will seem quicker.
As we said, the DNS only affect the first contact with your website. After the first contact your computer will retain the real address of your server, so it will not be needed anymore for some time. The exact time depends on configuration, it can be anything from a few minutes to a day or so. In practical terms the DNS matter for the first visit of each session in visiting a website. On average it does not speed up the rest of the session. However, on average your users will visit a few webpages at most, so the first visit can be a big part of their experience.
Is it worth to spend money to improve it then? A so-called premium DNS service can dramatically improve your performance in that area: quadrupling the speed (or more) from your standard nameserver is not impossible. You can see the average speed from the most popular DNS providers. You can also see that we are generally talking about less than 100 milliseconds. So, in terms of speed alone, it matters if your website is already loading under 1.5-1 seconds, otherwise there are probably other areas of improvement.
Choosing a premium DNS service has also advantages: reliability and security. Premium DNS service have their own security measures, that can block, or mitigate, DDOS attacks. They have a better or more widespread infrastructure; therefore they are more reliable and almost always reachable. This is also the reason because, much like a CDN, they can give you the most increase in speed if your audience is widespread around the world. Your registrar might have nameservers in just one place, they are everywhere.
The best choices are DNS Made Easy and dnsimple:
- DNS Made Easy costs 60$ per year, while dnsimple 50$ (with yearly paying)
- DNS Made Easy has an uptime of 17 years, while dnsimple is faster
- DNS Made Easy allows 25 domains in their cheapest plan, while dnsimple allows 5 domains with unlimited queries
If you want the cheapest good service, you can go with Namecheap Premium DNS, with 10$ a year per domain.
There are also ways to get a premium DNS for free: it is included by some managed hosting and it also comes with Cloudflare.
The Cloudflare way it is a great solution because they have the quickest DNS servers in the world right now. You can also use just the DNS service of Cloudflare, simply by disabling the WAF part of the service. The simplest way to do that is by pausing the whole service for your website. Although this obviously disables the security measures protecting your websites.
An alternative is going to the DNS section and by setting each DNS record to Proxy status -> DNS Only, by clicking on the cloud (the color is orange when active) in each record.

Caching
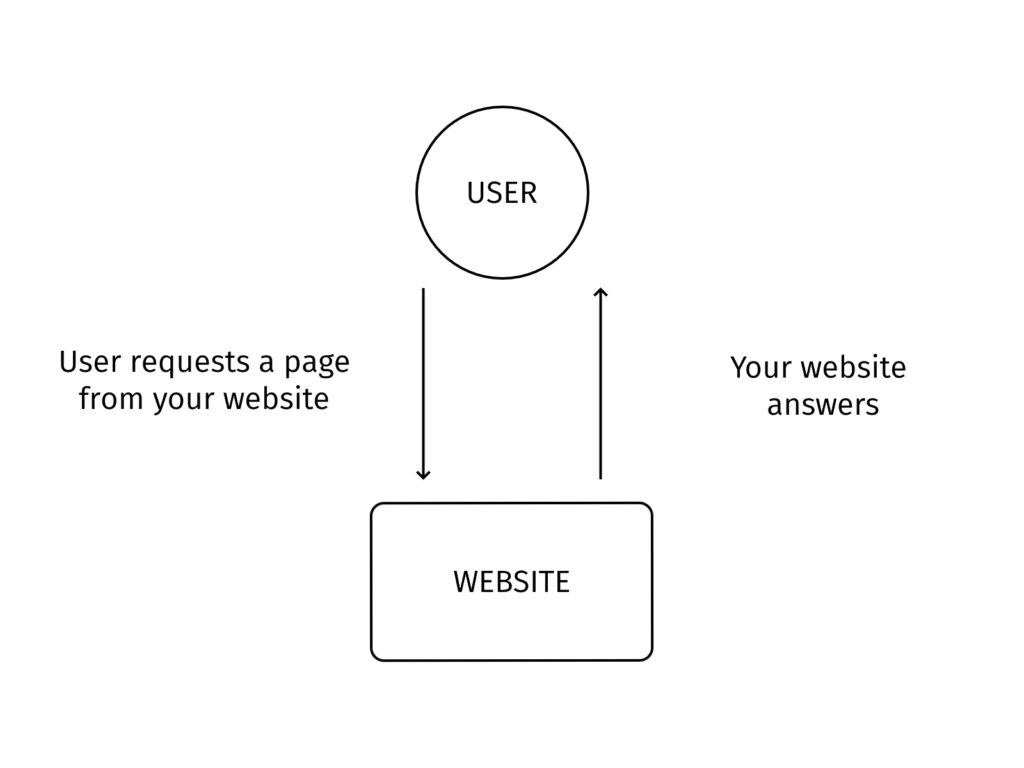
Caching is the practice of storing data so that later can be served faster. In a dynamic application like WordPress caching can, and does, happen in a lot of different places. This is a simplified scheme of what happens when you ask to see something to a WordPress application.
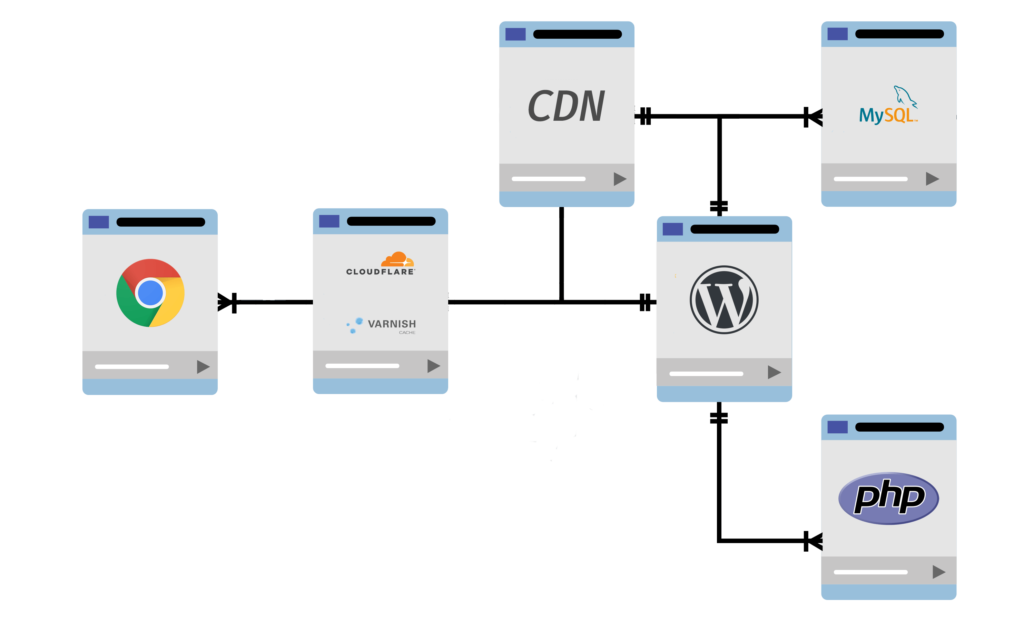
In short:
- the browser of the user requests to see a webpage on your website
- the request may pass through a reverse proxy, like Cloudflare or Varnish
- the request can also partly go to a CDN, either after the reverse proxy, if you use one, or after it has reached your WordPress installation
- your WordPress installation asks the PHP engine to execute the code to create the page and asks the MySQL server to retrieve the data it needs to fulfill the request
The request, or part of it, can be cached at any of these steps. You control your WordPress installation, so this is the place where most of the caching you care about happens. However, you can make caching happens in other places, and the closer to the user the caching happens, the better it is.
The three categories of stuff that you can cache are:
- the partial content produced by the services used by WordPress, like PHP and MySQL
- static files (i.e., images, JavaScript files, etc.)
- the dynamic content created by WordPress
Let us see how and where you can cache all these different types of content.
PHP and MySQL
Usually you have little control about the configuration of the MySQL server itself, unless you manage the whole infrastructure of your website. WordPress do also keep a small cache of MySQL data, but it is only used to generate a single request. It is designed just to not keep asking MySQL for the same data more than once per page. It is nice to have, but not effective when a request is over.
What you can do is to store the results of MySQL data outside of WordPress and then configure WordPress to use this external service. This is called an object cache. Common software used for this purpose are Redis or Memcache, very speedy and simple databases. This feature is very useful for services sites and not much useful for content sites.
The typical blog do not really need it, because when a typical blog requests the same data it is usually also creating the same page. For instance, if this WordPress asks MySQL the content of this article it is because it needs it to generate this page. Now, if it is used to generate just this page, then the whole page can be cached directly, so there is no advantage in just storing the MySQL data.
However, it is very useful for dynamic websites, like forums or ecommerce sites. That is because they can show the same pieces of content over and over in different places. Different users might request the same list of products, or parts thereof, in multiple places.
PHP is an interpreted language; this means that it goes through some transformations before it can be executed. The caching of these intermediate transformations of PHP code is called bytecode caching. You cannot enable this caching from WordPress, it depends on your hosting. Historically many host did not activate this form of caching. This is less common today, but in some shared hosting environments the caching of PHP code might not be active.
Therefore, it makes sense to check if you can activate PHP caching (also know as PHP accelerator programs) in your settings. With the most recent versions of PHP you should check for (Zend) opcache and activate it if present.
Static Files
When it comes to caching static files, there are two options:
- you can configure your webserver to ask to the browser to cache requests of static content (images, JavaScript files, etc.)
- you can configure a service to cache static files and serve them directly to the user
The second option is effectively what a CDN does. It is a service that takes your static files and give them to the user. Once you configure WordPress to use them, your job is done. They will cache the static files on their infrastructure in each of their servers. Notice what I just said, they cache content on each of their servers separately, so the more users you have in a certain location, the higher the chances that the user will receive the static files quicker.
The first option means that you say to the browser: once you get it, you can keep it stored somewhere for a certain amount of time because it will not change. This is the basic version, real caching instructions can be more complicated.
In theory you could ask the browser to cache every one of your images until the end of times, but this impractical. The browser might ignore the request, because it would occupy too much space. Besides, what happens if you change the image? This is even more problematic for JavaScript files that execute code and change the look and behavior of your page.
This is the major risk of caching control, the more you cache the more you risk the content going stale. That is, the user sees old stuff that you have updated. This is a tricky balance, so most of the time it is easier to just say to the server to cache static content. Whoever configured the server usually will have set a reasonable default time.
If you want to set caching time yourself you have to remember to think at the worst case scenario. For instance, you might cache an image for a month, but you should probably cache JavaScript for less time because they change frequently during development. And if you are planning a big change to your website, maybe lower the caching time for JavaScript and CSS files before you start, so the user will not risk seeing a broken website, with half old content and half new stuff.
Notice that you could also tell the user to cache the whole page, but this is less used with WordPress since it is a dynamic application. This makes it complicated to manage, because if a browser has cached the whole page then you have lost control. If the page goes stale, you might not be able to do anything to warn the user. If you want to cache the whole page, you do it on your server, as we are going to see in the next section.
Caching WordPress Page
You cache your whole page on your server. This is what you think about it when you traditionally talk about WordPress caching.
When you load a WordPress website, your server has to process a large number of PHP files and query the database a number of times. For pages that are not constantly updated, this is wasted effort. It is much more effective to generate each page just once, then store that page and deliver the subsequent visitors. This is what page caching does.
However, you can also move up your server closer to the user, in a manner of speaking. That would be caching on the reverse proxy.
In either case, caching allows the user to see significantly shorter loading times and will reduce load on your server. This can increase dramatically the ability to handle traffic under heavy usage.
Caching on the Reverse Proxy
Let us start by seeing this second option. You can configure your entire page on a reverse proxy. You may remember that we talked about reverse proxy before, when speaking about Cloudflare in the CDN section. Basically, a reverse proxy intercepts requests for your content, then if it can, it serves them up in place of your WordPress. Once your WordPress has produced an answer for a page, you can configure the reverse proxy to cache this answer and serve it for subsequent requests for the same page.
The reverse proxy can be a service like Cloudflare, that can be configured to cache your web requests. You, or you hosting provider, can also configure Varnish, a caching server that acts as a reverse proxy. Varnish is an application that was designed exactly for this purpose: to speed up dynamic websites like WordPress.
If your hosting provider already set Varnish for you, it could be a better choice than Cloudflare. That is simply because they gave you a software that was already configured for using it with WordPress. You will probably be given a plugin to make your WordPress talk with Varnish and invalidate the cache when it is needed. This frees you from dealing with configuration issues.
If you do not have this chance, you might want to use Cloudflare to cache your pages. It can be even faster than using Varnish because the user will just need to reach to the closest Cloudflare server to see the whole page instead of travelling to your server (or wherever your hosting has put Varnish).
There is a catch: you have to configure Cloudflare yourself. And this is not trivial to do. The service is dumb: it does not know or care what WordPress is, so it just caches the page it sees the first time. This means that if you are logged in to your website. Cloudflare can accidentally cache your admin bar! And it will show it to all your users. Of course, that is not ideal.
Other common problems are related to comments. They will be cached and so the users will see new ones with a certain delay. This might lead the conversation to stall. Or a user might comment on your website and, if they do not see it immediately, they might just re-try to comment and create a duplicate.
If you go this route you must be ready to test and check your results carefully. The first step is looking at the Cloudflare (basic) guide to cache WordPress and then installing their WordPress plugin to make your website tell Cloudflare when to delete the cache. This will not solve all of your problems, but it might help with testing. You should also take a look at the article Caching WordPress Pages using Cloudflare Page Rules for some tips.
Caching on WordPress
Most managed hosting providers gives you some way to cache WordPress pages and to manage caching with their own plugin. The provider might not technically cache the pages the same way a typical plugin would do it. A typical WordPress plugin would save a copy of the generated page under the /wp-content/cache/. Instead a provider might use a quick server like Nginx to cache the pages and serve them directly to the user.
However, this is mostly irrelevant, the end result is very similar. The way used by managed hosting might be a bit quicker, but it is not substantially better per se.
The basic idea is always the same: generate the page once, the first time any user asks for it, and then cache it to show it to all users that want it.
This principle is quite basic, so there are many plugins nowadays that can do it for your WordPress, even if your provider have not automatically set it up. The differences between the plugins are the configuration and the additional features. For instance, many plugins can also minify your CSS and JS files or activate Gzip compression. This can be a nice addition although the problem is generally with configuration.
While stuff like Gzip compression can be safely activated with just a switch, features like minifying your files is a different issue. Minifying implies that the library manipulates your CSS and JS files to reduce their size. In theory the manipulation should not change the behavior, but sometimes they do. Some plugins have so many options and so many ramifications that can be complicated to understand what they do. And if you just enable everything you site might stop working.
So the real difference between plugins, rather then features, are configuration and documentation. In this area the only plugin that is well recommended is WP Rocket, which is also the only one allowed in some managed hosting, like Kinsta or WpEngine. A free alternative that is also easy to configure is WP Performance.
Keep PHP Updated
PHP has historically a bad reputation for being slow and badly designed. The reputation was totally warranted. I mean, that is what Rasmus Leedorf (the creator of the language) said about the creation of PHP:
Facebook invented a new programming language similar to PHP just because PHP was too slow.
Nonetheless the language became successful because it is easy to use and can get things done quickly. And, by the way, this was also true for WordPress itself. Early versions were famed for bad security and slowness.
This all changed in recent years. Both WordPress and PHP have much improved on all counts. The version PHP 7 dramatically improved the speed of the language and new releases kept improving.
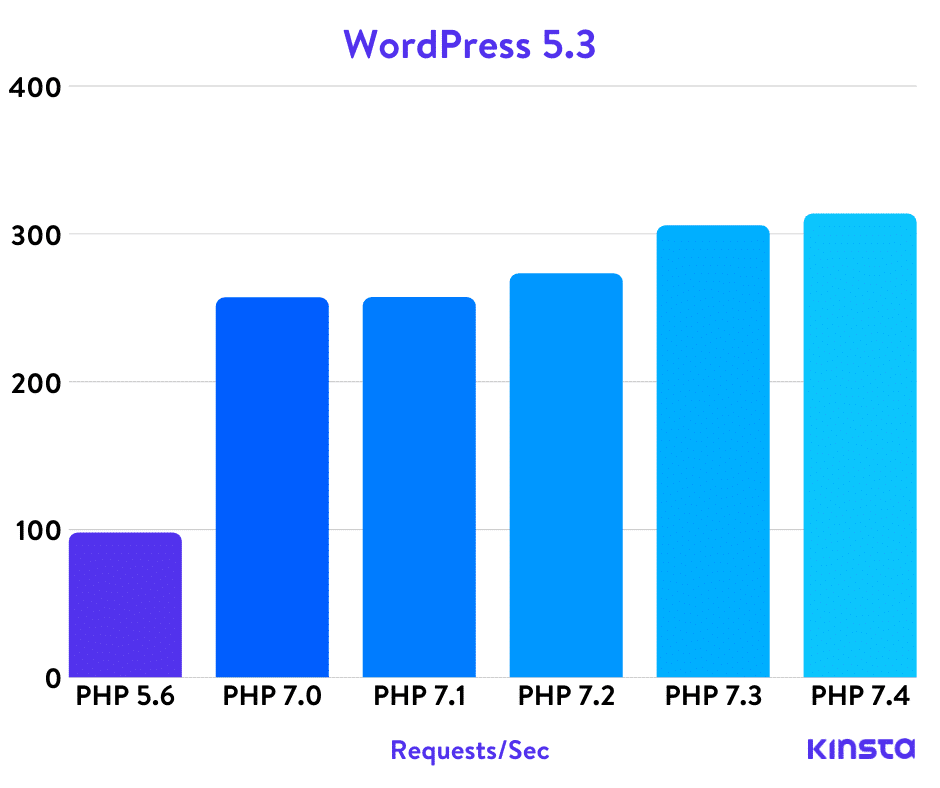
Look at this benchmark from Kinsta. PHP 7 has more than doubled the number of requests per seconds that WordPress can handle. This is a dramatic improvement. And from PHP 5.6 to PHP 7.4 this numbers has more than tripled.
This is why you should make sure to choose an hosting that is able to quickly upgrade its PHP version support. This way you can get performance improvement for free, by just using a new version. Now, to be fair, there has been a drawback: a lot of old code has to be updated. This might have been a lot of work for some developers. However, for you, the user, that was a problem only if you were using old unmaintained software, which was already a risky proposition.
Theme
The theme can be an important part of improving your performance. A WordPress theme is not just a graphical way to show your content. It is the structure in which your content is inserted. It governs how and when sidebars are inserted, how to organize content on mobile and desktop platforms, etc. Consider this: if a page is mostly text, the theme itself will comprise most of the size of that page. A theme that is complicated, badly coded and old will take time to be processed and might send useless content to the user.
This aspect has been ignored in the past, but now the theme is getting the attention it needs. This has been true both from Automattic itself, the company that makes WordPress, and the theme developers. In the quest for ease, developers have created and used theme frameworks and so-called websites builders that were heavy and required a lot of logic to work. Yes, they allowed even the average user to (somewhat) easily build great layouts, but they were costly to display.
In addition to that, theme developers created large, complex and flexible themes that could be useful to build every website. The user could learn to use it once and then re-use it for all of their websites. The theme developer get repeated sales. It was a win-win. And this is certainly an appealing proposition, if you accept lower performance.
A New Kind of Theme
These tools are still there, some are still bad and some have improved. However, now a new kind of themes are also available: a cross between a theme framework and a light theme. There are themes that are not really ready-made to use in a website, but they provide a solid general foundation and a few plugins to pick-and-choose for each website.
With this approach you get the flexibility and also a light theme, with the drawback that you need a bit more work to get started. Currently the most famous of these themes are Astra, GeneratePress and OceanWP. They all are solid choices that you should explore if you are looking to build a new website or to redesign an old one. It is a different balance, that might the right one for you.
In case you are wondering, I am using an Astra theme for this website.
Speeding Up Your Current Theme
Now, what about your current theme? Is there is something you can do to speed it up? Well, if its design is flawed there is little you could do really. There are a few tweaks that can be useful around the edges, but they come with drawbacks on flexibility.
We are going to see later some plugins to improve the overall experience of your website, but few things you can actually do with your theme directly. Even then, their effectiveness will vary on your specific theme.
Removing the Superfluous
For instance, some themes come with plugins that are automatically inserted to include sharing buttons. In this case you can remove the sharing buttons altogether or replace them with something with a better performance. However, this means finding that something better or losing a functionality.
Many themes come with support for an array of features2 and even to allow integrating famous plugins or tools3 which is great if you use them. On the other hand, if you do not need them they can slow down your website.
In theory you could check the code yourself to see if there is anything you can improve. In practice this is probably not going to work, since the theme will be updated. You also need to get familiar with the theme itself, which takes some time. This means you will have to do it regularly; it would easily become a time-consuming chore. Furthermore, you need to know how to program in PHP.
The practical solution is to check every option and deactivate any feature you do not need. A more elaborate change is in the structure: you could simplify parts of your theme, such as elaborate menus. This can be done via configuration, without diving into the code.
Most professional themes also come with different Google fonts: one for the headings, one for the main content, one for quotes or widgets, etc. This is useful to make your website look better or more readable, but it can be superfluous in many cases. Unless you have special needs you can survive with less. Just having a custom font for either the headings or the main content will suffice to make your website stand out, while improving performance. You could usually pick them in the settings section.
You have to remember that Google Fonts (i.e., web fonts) were invented in a time where there were just few fonts available on most computers, like Arial or Times New Roman. These were not terrible fonts, but they were one-size fits all, so they did not integrate well with the design of any platform. Nowadays you can take advantage of the system font stack. This means that each users will see their typical system font (e.g. Segoe UI for Windows) which are already present on their devices. These fonts fit the overall style of their device, so they look great.
Considering that web fonts are about 6% of a webpage size, you can have some savings by not using them. The downside, of course, is that your website will lose some of its identity. Adapting a theme to use system fonts will also require you to work with code or to hire some developers to do it in your place.
Plugins
Together with the theme, plugins can be a big part of the hidden causes of your performance problems. You need them, but do you really need all of them? You need that feature, but do you need that particular plugin? Or is there a plugin with a better performance out there?
Are They a Problem?
The issues is not just the number of plugins, but their quality: pick the ones with the best reviews.
As we already said, you should not really use a professional WordPress website as your repository for everything. You should put in your WordPress installation only what is necessary to provide content. For the rest (e.g., CRM, statistics, etc.) you should use an external service to offload the cost to something else.
An example of a target for this offloading are analytics plugins. The famous plugin Jetpack from Automattic itself can provide basic stats, but you can also use Google Analytics4 or any number of simple analytics services, such as Plausible, Fathom Analytics, Simple Analytics, etc. If you need something more powerful to replace Google Analytics, you can use Matomo. It is an open source analytics platform that you can host yourself or use as a service.
Another problem with using many plugins is that, when you disable them, they might leave traces behind. This is usually not just a problem of bad behavior. They can keep configurations values. So that, if you re-activate them, all your favorite settings are already present. However, this means that if you do not plan to reuse them they will clutter your database. And considering that a website can last decades, how much stuff you have in your database? There are plugins that can clean your database for you. However, you should also remember to select any option such as Delete configuration when you uninstall a plugins. And try any plugin on a staging or temporary website, if you can.
To be fair you should also think about how exactly plugins impact the performance of your website. For example, if the content they provide is cached (e.g., they change something on a post), their effect might be limited. They will hit your performance only the first time the content is created, that is when it is not cached. In short, your website will be slower once, then the plugin will not affect it.
The issue is that, unless you are a programmer, it can be harder to understand when that is the case. A general rule of thumb is that if they do something dynamic, like loading JavaScript code, they can hit you every time.
Finding Bad Plugins
Now, once you have done it, you may ask yourself how do I find bad plugins? Great question! Well… Once upon a time there was a great plugin for this P3 (Plugin Performance Profiler), however GoDaddy has stopped maintaining it, so it does not work anymore. A simple trick is to look up the banned plugins of reputable managed hosting providers, such as Kinsta. They ban plugins with bad performance on their infrastructure, this also mean that they will have a bad performance wherever you host your website.
Entire types of plugins in general can be problematic if you are not careful. For instance, backup plugins can be a problem if they backup your whole website in the middle of the day. They can generate high load on your database and hosting. So, if you see an unusual high load at the same time each day you might know the culprit. The solution is to use the backup feature provided by your hosting or to configure these plugins to back up your website when your traffic is lower.
A more structured approach to the issue is to test the performance of each plugin manually:
- You need a hosting that allows to setup a staging website
- You deactivate all plugins on the staging website
- You ran a load test5 of your website to find the baseline performance
- You activate all plugins
- You ran a load test of your website to find the actual performance of your website
- You deactivate plugins one-by-one
- You ran a load test of your website each time to find the effects of each plugin
This is cumbersome and slow. It can also be a bit costly if you use a load test service. However, you only have to do it once for each plugin, so it can be a manageable process. It also do not require you to be a programmer.
If you are a programmer instead, you can make a deeper analysis using a plugin like Query Monitor. It will not do a performance analysis for you, but it will give you an insight on what each plugin does. It monitors database queries, calls of some WordPress API, etc. It can make your life easier, but you will have to do most of the work of analysis.
They Can Be a Solution
Plugins can be a problem, but they can also be a solution. Essentially you can use a plugin to optimize the configuration of your overall WordPress. This includes settings of the WordPress installation (e.g., comments) and the way it presents contents to the user (e.g., the order in which it sends JavaScript files to the user).
While WordPress itself is well-optimized it can also support a lot of historical features that are not much used anymore, such as trackbacks or XML-RPC. Or it can provide features that you want to disable, like comments.
You can configure some of these things manually, but most of them requires plugins. We are not going to list all of settings you can tweak because there are some caveats and things to consider. And this post is already more than 13 thousand words. Even worse, a lot of things in this category are quite technical. For instance, deferring the loading of scripts means that you load the scripts after the main content (i.e., the article) has been shown to the user. However, this might introduce weird bugs in your websites that can be hard to notice unless you know where to look.
So, we are concentrating on a few things that you can safely disable at the current time:
- XML-RPC and WLManifest, obsolete protocols and configuration for dead software6
- JQuery Migrate, JavaScript library to support old plugins
To be fair, they are also not an huge drain on your resources, but every bit counts.
Something that you should look for are also post revisions. They are useful in case you want to keep old versions of your post. However, they can hit you in a couple of ways. For some WordPress API, essentially any revision can be like a post of its own, so every post can count 10, 20 times, depending on how many revisions you have. The second issue is that they clutter your database. This take space, but even more important can slow down searching and retrieving any post from your database.
The moderate solution is to limit the number of revisions to a reasonable number for your use case. The alternative is to remove them altogether.
Plugins can be a solution to such configuration problems and also change some options that cannot be removed via the WordPress admin panel. They are not required if you can code yourself, but they can be useful to save time in researching which ones are the bad configurations and setting the right one.
For example, this is how you limit or disable post revisions. You can do either of these things manually, by setting a value in the file wp-config.php. The configuration value is:
// set to a number to limit the number of revisions
define(‘WP_POST_REVISIONS’, 4);
// alternatively set to false to remove them altogether
define(‘WP_POST_REVISIONS’, false);
If you have no idea what and where is the wp-config.php file then you should use a plugin. Or maybe you just want something easier to configure7.
We already mentioned such plugins in the caching section: WP Rocket and WP Performance, they also do these kinds of configuration. A paid option that just cares about configuration is Perfmatters. They go deeper and can be a solution if you already use caching via your hosting.
Using Images for Maximum Performance
Images may compose the largest part of your request size. This is surely true if you post large content articles, with a lot of images. It is also likely true for ecommerce sites. Therefore, it makes sense to optimize each step of production and delivery of your images.
Choosing the Right Format
There are three formats that you should use on your website: JPEG, PNG and WebP. There is a good reason to use each of them:
- PNG, is the most common format for images with few simple elements (e.g., logos, graphs, diagrams, etc.) or that needs a transparent background
- JPG, is the most common format for photos
- WebP, is considered by Google the best image format for either of the two, but it is not supported by Safari (things may have changed when you will read this, check on caniuse)
If your image is animated, things get complicated. GIF may be the easier and more widespread format, but it can create really large images. So, your best option is simply to upload any GIF to a GIF hosting websites and embed it in your articles. The GIF hosting site will take care of optimizing it by converting the original GIF to a video.
In short, at the moment you should create your original images in either PNG or JPG format and then use a WordPress plugin to convert and show the WebP version to the user when appropriate. That is the approach we are using in this guide.
Beware of PNG
You generally do not care about the technical reasons behind each choice. However, you should be aware that PNG is the riskiest of the three formats. In the sense that you can create really large images if you use it for the wrong thing or without proper configuration.
For instance, if you create cover images for your posts with a tool like Canva you could create much larger images, if you do not pay attention. This is because Canva is designed to create cool graphics and presentations. So, by default they use the PNG format, but if you use it to made a background photo with the title of your article, you can create large images. Therefore, remember to save or convert such images to JPG.
For example, the following image is 60kB when saved as JPG, while ten times that size when saved as PNG.

Optimizing Image Size
If you create your images yourself, you can use the setting Save for Web, or equivalent, in your image editor to reduce the size of your image. With the JPG format, you can safely get away with saving images with 80% quality without noticing any issue in the image. A lower quality may be more noticeable with some images.
Images from stock website may be already optimized. For example, photos on the most famous services, such as Pixabay and Unsplash, are usually already largely optimized by the creator. In my testing, optimizing most of the images from such services get you less than 10% reduction in size. Though this is true for most and not all of them.
In any case, you can ensure your images are optimized using a desktop app or a web service that integrate with WordPress. Generally, the final size of all the images are the same, given that that behind the scenes they all use software of similar quality to reduce image size.
They may vary in configuration, but the differences are minimal. Unless you have lots of traffic and images, taking time and testing to find the best compromise between quality and compression is not worth the effort.
On the desktop, you can use the Caesium app to optimize JPEG images and image-min to optimize PNG images. You can probably tweak either of the two programs to get optimal results for both formats. However, on my testing, if you just want to download and use them immediately, each of them works the best for different formats with their default configuration.
The alternative is to use a plugin to optimize the images directly on WordPress. There are a few of them, but I would suggest using Imagify. It has a WordPress plugin that integrates with its own service. The service offers a free tier of 25 MB of images converted of each month. This plugin also provide conversion and delivery of WebP images.
There are plugins that directly convert the images on your webserver, but they might be banned by managed hosting providers because they create a stress on the webserver8.
The Imagify plugin is the easier choice, if you already have a lot of images on your WordPress. Personally, I prefer to optimize them locally, so I need to do it just once.
Using WebP Images
We already mentioned the Imagify plugin, that can be used both to reduce the size of your JPG and PNG images and handle WebP images. The plugin can convert images to WebP and deliver them to all supported browsers.
If you only need the conversion and delivery of WebP images you can use the plugin WebP Express. This plugin has the advantage of giving different options for conversion and delivery of WebP images. Everything works by default, but if you like to tweak things you have this option. Furthermore, it can convert them locally on your server. As far as I know, it is not banned in any managed hosting because it is well configured to avoid any undue stress on the server.
Lazy Loading
A good option to reduce the impact of images on the first load is lazy loading. This is technique that initially makes the browser download a webpage without any image on it. Then, when the user scroll down where the image should be, the image is downloaded9.
This technique is very effective to reduce the loading time of large articles with many image. An article such this one could weight several megabytes with all the images. By lazy loading the image we can dramatically improve the initial loading time on slower connections.
The downside is that they might be conflicts with other features that manipulate images or re-arrange them (e.g., galleries). So, you must do some testing on your setup before enabling this option. The other issue is that you could see the page flicker, or the image may take some time to appear if the user quickly scroll down an article.
This feature is now included in WordPress itself, although with the limitations that does not work on old browsers10. However, it also comes in many caching and image-related plugins where it can be configured as you need. A good standalone (and free) plugin that can enable this feature is Lazy Load – Optimize Images, by the same authors of WP Rocket. This plugin will implement this functionality also in older browsers.
Content Tricks
In this section we mentions some of the major content tricks to improve performance. That is to say basic stuff that you can change. As usual, none of this is a sure thing you should do. It depends on your usage. However, statistically a lot of people set them in a way that can be problematic.
Showing Excerpts
Showing the full content of your posts in your feed can make life easier for your readers. On the other hand, showing the full content of your posts in your homepage, or in the articles page, can be a problem. For example, my websites tend to have a lot of long-content articles. If I show the last 10 articles in full, a page could easily reach 50 000+ words! And probably more than a few megabytes of images.
Obviously, your website might be different, but most people just skim your list of articles in search of something interesting. Then they would click on a single article to read it. So, it makes sense to make their life easier and just show excerpts rather than full articles.
Reducing Load From Comments
If you have a popular website, comments can occupy a significant part of the length of your page. This does not mean that they increase significantly the size of your page: they cannot have images, so their impact is limited. However, they do occupy a lot of real estate. If you want your users to see something in the footer, they will make it harder. Furthermore, they do have to be taken from the database and might be only partially cached (because they can change frequently).
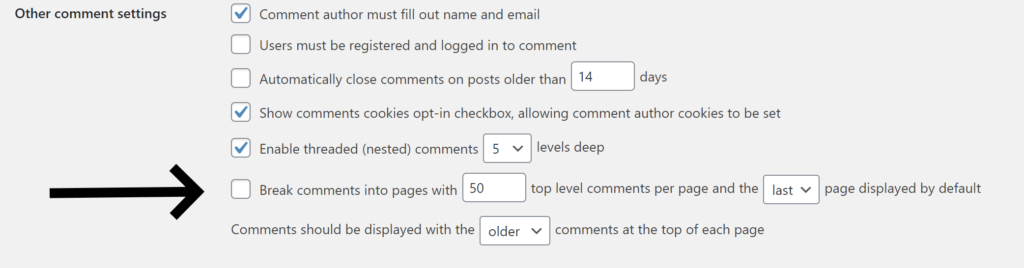
This is the kind of nice-to-have problem, since it would mean that your website is quite popular. However, it is still one more problem to solve. The simplest thing to do is to go in the Settings->Discussion section of your WordPress admin panel and select the option to paginate your comments (i.e., set the option to break comments into pages) to a value that works for you.
A neat alternative is to use a plugin to lazily load comments. This is a good compromise in case only some users care about taking part of your community. Or to hide that you have a terrible community.
Social Sharing Plugins
I remember the time when the internet was young and there were a lot of social networks. Nowadays the data is in: only a minuscule part of your readership share your content on your website. Even if they do share your content, they usually do it directly when they see on the respective platforms. I.e., they might retweet something that mentions your article, the chance that they actually click the tweet button on your website is close to zero.
The drawback instead is that they can put a lot of third-party trackers on your page. This hurts the privacy of your readers and slow down your website.
The advantage of social sharing plugins is mainly as social proof: readers sees that a lot of people have shared your content. This is why most websites nowadays do not use the Like or Tweet official buttons directly. They show custom buttons that allow a user to share your content, and more importantly, they show a cumulative sharing count. If you have a plugin that does something different you need to change it.
Summary
In this fantastic guide we have seen how to approach the performance of your website. We have explained the major issues and how to handle them in a way, hopefully, that even non-technical users can understand.
However, there is a lot more to be said about performance. For example, a common aspect to consider is calls to external website and services. For performance reasons it is better to offload anything possible to third-parties. On the other hand, now you have a different problem: you call a lot of third parties.
This is less of a problem in recent times, for technical reasons. However, the handling of this aspect is complicated and different on every site. There is not one-size fits all. Also, it is quite technical, so it is not a good fit for this article which is meant for the general public.
If you are technically inclined, you can read how to deal with these and other technical problems in this guide from Kinsta.
Happy performance to you all! And let me know in the comments if you want me to add something more to this article.
Notes
- They probably would, if it was legal.
- widgets everywhere
- Mailchimp is a fan favorite
- if you hate privacy
- you simulate high traffic in some way. There are services to do that
- Windows Live Writer was cool
- I may have broke a website myself by forgetting to add a semicolon
- this is actually true only for mass conversion of images, not converting individual images. However, it is probably easier for them to ban them altogether
- this can happen via JavaScript or implemented directly by the browser
- also you need to setup the attribute width and height of the image, but WordPress should already do that